Gorgeously striking and effortlessly wispy — wet-look lashes are the perfect way to accentuate your eyes and add a touch of glamour to your everyday look.
Imagine lashes that glisten like they’ve caught the morning dew—irresistibly shiny and oh-so-luxurious. It’s not just a style; it’s an art that captivates eyes worldwide. But what’s the secret behind this trend’s allure? Get ready to dive into the details and master the art of creating those stunning, glossy wet look lashes!
What Are Wet Lash Extensions?
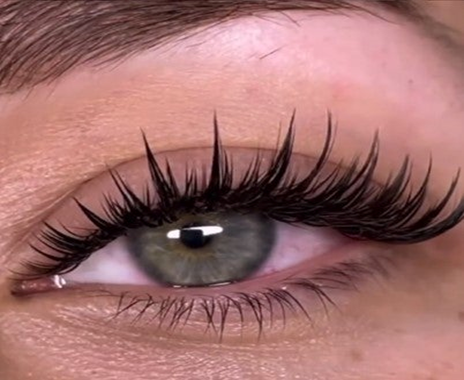
Wet Look lashes are a modern and sophisticated style of lash extensions that mimics the appearance of wet, glossy, and luscious lashes. Unlike traditional eyelash extensions, which tend to have a more natural matte finish, Wet Look lashes give the illusion of having recently applied a light coat of mascara or, as the name implies, the appearance of wet looking lashes. This glossy effect will add depth and allure to your client’s eyes, making them appear larger, more defined, and captivating.
Why Are Wet Look Lashes So Popular?
- Bold and Eye-Catching: Wet Look lashes are perfect for those who want to make a bold statement with their eyes. The glossy finish of these lash extensions draws attention to them, making them stand out and highlight the natural beauty of your client’s eyes. It gives that ‘just stepped out the shower’ vibe!
- Long-Lasting Lashes: Wet Look lashes typically last longer than traditional eyelash extensions, thanks to their water-resistant coating of Lash Sealant, making them ideal for special occasions or vacations. These glossy lash extensions will stay put, so your clients can enjoy their dazzling lashes without any worries.
- Suitable for Various Eye Shapes: No matter the shape or size of your clients’ eyes, Wet Look lashes can be customised to suit their unique features to complement their overall appearance. You can create Wet Look Lashes using the lash mapping you’d typically pick for your client, from Dolly Eyes, Cat Eyes, Squirrel or even Manga lashes, the world is your oyster!
Who Is Suitable for Wet Look Lashes?
The wet look lash extensions cater perfectly to clients accustomed to wispy or textured lash sets, ideal for those seeking a unique lash style that’s neither purely classic nor voluminous, specifically:
- Individuals prefer wispy or textured lash sets.
- Those with lashes ranging from ample to full in volume.
- Clients looking for a style between classic and volume extensions.
- Anyone desiring a versatile lash style adaptable to various eye shapes and styles. Wet look lashes are suitable for almond-shaped eyes, round eyes, hooded eyes and even monolid eyes.
Wet eyelash extensions offer a versatile allure, ideal for those wanting a high-fashion, glossy finish that commands attention and admiration. They transcend being mere extensions, becoming an essential style statement for those craving luxurious, standout allure in their lash game.
How Do You Create Wet Look Lashes?
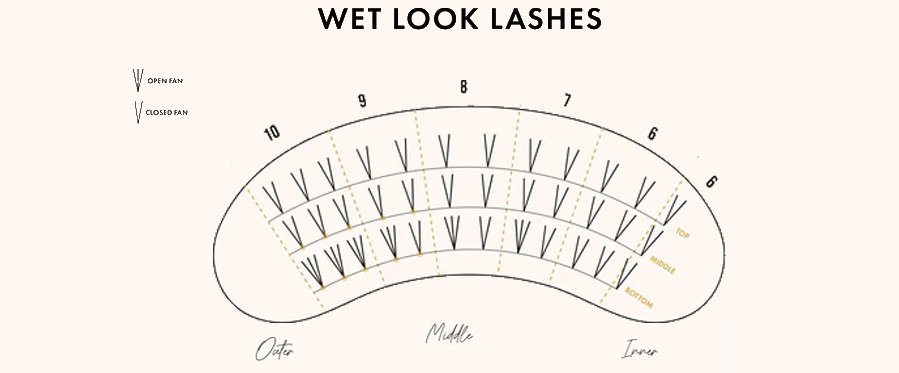
A NOTE ON SPIKES
A Wet Look Lash set breaks the rules a little bit in that it uses volume lashes, but doesn’t fan those lashes out – what you’re aiming for is closed fans or spikes.
The easiest way to make spikes is to take some Eyelash Primer on a microbrush and apply it along the tips of the lashes on the strip. This will keep the tips together making spikes much easier for you to pick up. Be careful not to get Primer on the bases of the lashes, as this will cause your lash glue to polymerize more quickly and might give you retention issues as a result.
Secondly, when it comes to spikes we’d recommend using finer volume lashes than you would if you were creating fans – because the weight isn’t as evenly distributed with spikes as it is with fans, you may see that the natural lashes are weighed down more with the spikes than with fans if you use the same thickness.

All that covered, let’s see how to create Wet Look Lashes!
- Starting from the bottom layer, take a piece of Micropore Tape and use it to lift all the lashes back, fixing the tape to the upper eyelid. Taking a pair of Isolation Tweezers, pull out the bottom layer of lashes. Begin your application on this layer but make sure to follow your shorter map lengths. Once this layer is covered, apply a little Superbonder to the bonds of the lash glue ensuring the glue is completely dry to avoid any stickies.
- Once you have finished the bottom layer, take your isolation tweezers and free the middle layer of eyelashes. If clients have more than three layers of eyelashes, treat the middle layer as the middle two as this will add more density and it will also make the spikes on the top layer stand out. For the middle layer, add spikes which are 1 mm longer than the spikes you used on the bottom layer. For clients with sparse eyelashes, apply some open fans in the middle layer to close the gaps.
- For the final layer, you can finally get rid of the tape. Here, you can either apply spikes that are 1 mm longer than that of the middle layer, or you can use the same lengths depending on your desired finish and texture. Once you’re done with the application, apply Superbonder on all the glue bonds and give the lashes a brush through making sure to look out for any stickies.
By embracing the art of lash mapping, tailoring your technique to individual eye shapes, and using high-quality lash supplies, you will unlock your potential for creating captivating lash masterpieces that leave your clients feeling stunning! May your clients emerge from your lash room with eyes that glisten with their Wet Look lashes wherever they go. Happy lashing!