Blog
Eyelash Extension Guide: How to Remove Lash Extensions?
Eyelash extensions are a perfect, zero-effort addition to any beauty regime, removing the need for mascara or falsies for a breezy morning routine. However, when those beautiful extensions start falling out a few weeks later, that dream can become a bit of a nightmare. So whether you just don’t have time to see an eyelash technician at the moment, or you want to give your lashes a bit of a break, there are a few things you can do to aid the removal process.
Here’s how to remove eyelash extensions at home without damaging the delicate natural lashes beneath.
Is It Safe To Remove Eyelash Extensions At Home?
For the safety of your eyes and lashes, removing eyelash extensions instantly should be left to a professional when possible. They have the right tools and expertise to do the job safely, and a D.I.Y. removal could result in harmful bacteria contaminating your eyes.
Fortunately, you can learn the safest ways to professionally remove eyelashes at home with an extensive eyelash extension course. However, if you aren’t equipped to carry out a professional removal at home, there are things you can do that will help speed up the removal process.
Unfortunately, patience is key with at-home extension removals since they can take a few days or even longer to remove all the lashes.
How to Remove Eyelash Extensions at Home
Many DIY guides out there use ineffective products or even dangerous methods that can ruin your natural lashes.
In my experience, you can get the job done safely by following these 4 easy steps:
- Wash your face.
- Steam your face.
- Apply oil and wait.
- Gently remove the extensions.
I’ve described each step in greater detail below.
Step 1: Wash Your Face
First, you need to wash your face to remove any makeup or oils.
Make sure you use a gentle cleanser and pay special attention to the eye area.
We need all that mascara and eyeliner off.
Once you’re finished, simply rinse with lukewarm water and use a lint-free towel to pat your face dry.
Step 2: Steam Your Face
Next, you want to steam your face for about 10-15 minutes.
This step will help soften the lash adhesive that’s used to attach the extensions to your natural eyelashes.
So, the best way to go about this is to use a kettle to bring the water to a boil.
Then, pour the hot water into a large bowl.
You could just put your face over the bowl, but I found it a lot more effective to drape a towel over my head and hold my face about 12 inches away from the water.
It sort of creates a little tent or a mini steam room.

Step 3: Apply Oil and Wait
Do you remember your lash stylist telling you to never use oil-based makeup remover?
Oils are notorious for breaking down the lash glue and causing poor extension retention.
So, you can get a small bowl and fill it with coconut oil.
Why coconut oil?
Because it’s able to penetrate the hair shaft more effectively than other oils and break down the adhesive properties of the glue. (More on that below).
Warm up your oil for about 10 seconds in the microwave.
Then, soak a lint-free cotton pad in the warm oil and place it on your lashes.
You want to “sandwich” your eyelashes with the pad so that it comes into contact with all of them.
I generally hold that position for about 5 minutes per eye.
There’s no need to rub the oil or make harsh motions.
We only want to apply the oil gently so that it makes contact with all the extensions.
Quick Tip: I prefer not to use Q-tips because the cotton fibers can get caught in the extensions, and you might pull out your natural lashes in the process.
Step 4: Gently Remove the Extensions
Use your fingertips or a lint-free cotton pad to carefully wipe down from the base to the tip of your lashes.
You should start seeing a few extensions coming off.
If you feel any resistance, stop your motion immediately.
That means the adhesive is not weakened enough.
If you pull too hard, you risk plucking out your own natural lashes.
In such cases, you need to re-apply more oil and wait again for it to work.
If again it doesn’t work, then you’ll have no other choice but to have your extensions removed by a professional.
How to Remove Eyelash Extensions Professionally
While knowing how to remove eyelash extensions at home can be helpful, sometimes it’s better to let a professional do what they are best at. Getting your eyelash extensions removed professionally will preserve the health and integrity of your natural eyelashes and ensure that the process goes off without a hitch.
You can get the job done by following these 5 steps:
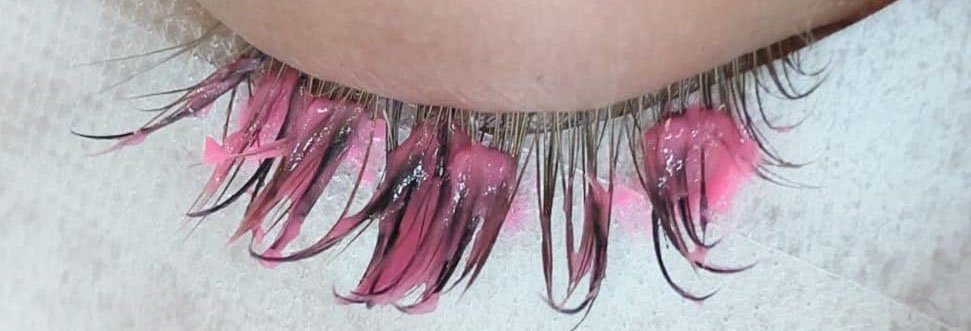
- Use a gel-based remover or cream-based remover. The gel remover is typically clear with a high viscosity. It’s used for spot removal of a few extensions. The cream remover is typically more viscous and used to completely remove your extensions. I personally prefer to work with cream-based ones.
- Apply the remover as close to the lash line as possible without touching the skin (that would cause irritation). Place a paper towel under the lashes to keep the eye pads clean.
- Let it sit for 3 to 5 minutes.
- Use a lint-free applicator to gently remove the extensions by pushing the extension against the paper towel.
- Wipe down the natural lashes to remove any product left behind.

