Blog
Eyelash Extensions Guide: How To Use Under-Eye Patches
Welcome to the world of professional eyelash extensions, where attention to detail reigns supreme. Among the many essential steps in this intricate process, the application of under eye pads takes a front-row seat. As a lash technician, regardless of your experience level, mastering this fundamental technique is key to providing your clients with the utmost safety, comfort, and satisfaction. In this comprehensive guide, we will unlock the secrets to flawlessly applying under eye pads, setting the stage for a truly mesmerizing lash extension experience!
What should a good set of under-eye pads do?
- It sticks well on the skin and does not slide off during the lash extension application.
- It repeats the shape of under eyes and grips the bottom part of the lashes well.
- Its surface should be coated so the liquid products like glue or primer don’t get absorbed.
- It helps to grab the inner and outer corner of the lower eyelash, making the work of the lash artist easier.
- It should be a light color so you can see the lashes well.
- It works as a canvas for the artist to draw a lash style map. Lash mapping is a great technique to help to stay on track to achieve your desired look or style.
- It soothes your client’s skin making the under-eye area feel relaxed and comfortable, giving them a great experience during the long process of lash extension application.

How To Apply Lash Patches
Step 1: Placing the Under Eye Pads
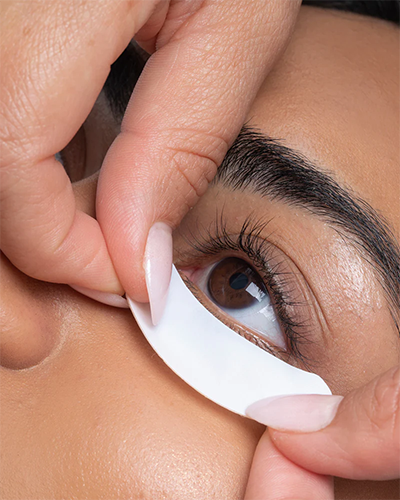
Using premium quality under eye pads, we proceed to place them delicately over the bottom lashes. Remember, every client is unique, and the positioning of the under eye pads may vary. Take some time to experiment and find the perfect spot for each individual.
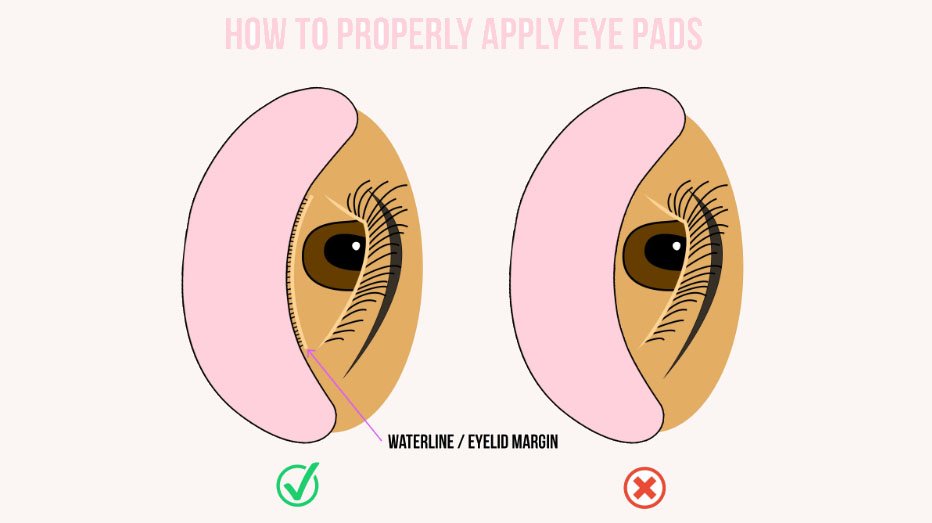
Caution: Avoid placing the pads too close to the eye or within the waterline area, as this could potentially cause discomfort or bruising. Instead, aim to position the pads right next to the lashes, ensuring the client’s eye remains safe, healthy, and comfortable.
Step 2: Securing the Under Eye Pads
To ensure a secure fit, gently fasten the inner corner of the under eye pad and gradually move outward. This technique provides maximum comfort to the client while keeping the lashes in place throughout the extension process. Repeat the same steps for the other eye, meticulously catering to each eye’s unique shape and requirements.
Pro Tip: In case some baby lashes pop up, effectively cover them with a small piece of lash tape. A diagonal placement works best, ensuring the lashes stay neatly arranged.
Step 3: Client Comfort and Adjustments
Once both under eye pads are in place, ask your client to slowly close their eyes. Always prioritize their comfort, regularly checking in to ensure they feel at ease. Don’t hesitate to use your clean fingers to gently manipulate the lid or eye area, making any necessary adjustments to ensure a perfect fit. Keeping an eyelash mirror on hand allows you to monitor the eye’s full closure, guaranteeing the utmost precision.

Addressing Common Issues with Under Eye Pads
Addressing Common Issues with Under Eye Pads
Even with the best preparation, you may encounter some common issues during the eyelash extension application process. Here are some tips to handle them effectively:
Eye Pads Not Sticking
Ensure the eye area is thoroughly cleansed and free from oils and makeup. If the pads still don’t stick, try a different brand of under-eye pads or tape.
Client Discomfort
If the client experiences discomfort, check the positioning of the eye pads. They should not touch the water line or the eyelid margin. Adjust as necessary for a comfortable fit.
Irritation or Redness
Use hypoallergenic and gentle products to minimize irritation. High-quality collagen under-eye patches are designed to be gentle on sensitive skin. If irritation persists, consider switching to hypoallergenic eye pads or gel patches.
Difficulty Securing Lower Lashes
For stubborn lower lashes that are difficult to secure, use a combination of under-eye pads and lash tape. Silicone eye pads and hydrogel pads can also be effective for securing lower lashes.
Lash Extension Eye Pads Don’t Fit
It’s also worth noting that 1 set of eye pads may not fit all clients, even with customizations. Different eye shapes and even face can cause the standard lash extensions eye pads to be extremely uncomfortable. If you only want to keep 1 style of lash pads in stock, you can still make it work. Here’s the best option if you can’t make your eye pads fit comfortably:
- Place the eyepad right underneath the lower lash line but leave the bottom lashes still sticking out.
- This will help protect the sensitive under eye skin without getting into the clients eyes or into the waterline.
- The next step is to make sure the client’s lashes are all secured. We still need to tape down all of the lower lid lashes.
- Use a few pieces of micropore tape to carefully secure down those lower lashes.
- Be sure to cover both the inner and outer corners, without getting into the waterline.
- Always check to make sure your lash client is comfortable.
- Have the client carefully close their eyes, and readjust if needed.

Conclusion
While it may take a little extra time to make sure lash patches are applied properly, it makes for better results in the end. This can be one of the most important things you do as a lash artist. By doing this, you can offer your clients the best possible experience when they come in for lash extensions.
